

Part 4 of Small Table Fantasy Battles: Movement!
In this 4th part of our Small Table Fantasy Battles series we’re finally to the point of discussing movement, probably one of the most important aspects of the STFB game.
This is especially critical given that we have modified the battlefield size for the sole aim to provide faster and simpler battles. Movement should be simple, intuitive, and fun. One of the most hard and frustrating parts of WFB back when I played was the fact that you had to do complicated maneuvers while constantly measuring the wheel distances and arranging your regiments in contact with the enemy. Granted, they solved this partially when they added maximization rules (where you no were no longer clipping your opponent for that rare tactical advantage where you were planning to win simply by combat resolution) but much of the pain of moving a unit remained.
Movement phase
A unit can only do 2 things in the movement phase. Move (in any way) or stand still. The easiest case right here is the standing still part. You simply choose to not advance your unit as the troops either brace for a charge impact, change its facing or change formation while standing in the same spot. This should always be a valid choice for your units (unless forced to move or charge by any other status effect).
Any unit may stand still and not move during its movement phase.
This can be useful when you’re facing down a charge and when you’re exactly where you want to be, or when you want your unit of Archers to shoot without the movement penalty.
Any unit may spend its movement phase by rotating up to 180% degrees, effectively changing the direction of its facing.
This is most useful when you’re trying to draw a new battleline and need to angle your unit a bit, or when you have been outflanked by an enemy unit and you want to face the threat, so you don’t get flank charged next turn.
Any unit may change formation during its movement phase. The command stand (or the first stand) of the unit stays where it is, and the other stands of the unit can be moved if they stay in base-to-base contact and aligned border to border with the command stand, keeping the command stand as the center of the formation.
This is the most complicated maneuver, not because of the interpretation (which I strived to keep clear in the diagram) but because it can open different corner cases that players can exploit. Therefore, I added the “aligned border to border” requirement, to make sure that the stands can’t be placed misaligned.
Another point to consider is the fact that if a unit has more then 3 stands, maybe 4 or 5 or 6, this can produce comical redeployments of these stands. Fortunately, I don’t plan on units having more then 4 stands, and even this is still up in the air as 3 stands would make more sense to me. Keeping the command stand as the center of the formation was also added to prevent a unit redeploying it’s stands only on one side of the command stand, because the logical behavior should be to expand frontage by deploying both to the left and right of the banner (or front stand) or to shrink frontage to gain depth of formation.

For moving your unit and getting closer (or further away) from the enemy, we will have several options available.
First, a unit can move either sideways or backwards. This is a maneuver that should not allow the unit to glide effortlessly out of harms way, so a heavy movement penalty should be involved. Hard number deductions are the easiest, but they are not a big penalty for high movement units, so instead of saying: this maneuver costs 2 movement points it’s better to work with percentages.
Any unit can move sideways for up to half of its move rate, rounded up.
Any unit can move backwards for up to half of its move rate, rounded up.
In effect, what this means, is that a Move 4 unit can move sideways or backwards by up to 2 cm. A Move 5 unit can do it for 3 cm (half of 5, rounded up). A unit of Cavalry with Move 9 can move up to 5cm.
But what about moving forward?
The main concern for me here is the difference between Wheel and Change Facing. Warhammer adopts wheeling the unit as the main means by which the regiment can modify its direction. Other systems use the change facing approach.
I really like the wheeling option because movement feels more natural. When you are using change facing by pivoting on the spot around the center it makes it so that the movement is made up of 2 parts, the re-orientation and then the actual movement. When you are wheeling it’s a single continuous move.
The problem with wheeling is that you need to ensure the cost of wheeling is fair and that’s hard to do without measuring it like Warhammer did it. Furthermore, because you’re measuring the front corner movements, if the unit is very narrow but very long otherwise, the cost deducted by measuring is a fraction of how much the rear stands have moved.
Changing facing by wheeling around the center of the unit helps reduce the actual distance that the back ranks are traveling though, even if it might feel a bit less fluffy.
Since we are all about usability, I have decided (after about 2 hours of measuring stuff and thinking about pros and cons) to go with the Changing Facing (otherwise known as Pivot on the spot) solution. This will not come easily to me (as a formed WFB player) but I trust it’s a step in the right direction for gameplay.
Any unit may move directly forward according to its move rate. The unit may pivot on the spot (around its center) at any point during its movement for up to 90 degrees but this costs half of its move rate, rounded up.
This allows a unit with a Move of 4 to either move 4cm directly forward or move 2cm forward and perform a 90-degree pivot. It might also mean a 90-degree pivot to left or right and a 2cm move afterwards. It allows for an increase in flexibility compared to a pure Warhammer approach where the 90 degrees wheel would consume all your move rate in one go while not giving that much back to the unit.
Another major maneuver that you might say it’s the most used one at the beginning of the game is the Forced March move. Simply called March in Warhammer it allows a unit who does not have any enemy units around it (at a certain range) to double move, as its soldiers perform a rapid advance. This is a good way of taking your troops to get in contact with the enemy faster but again, it’s only doable when you have no enemies around you (that can “march block” you). In the spirit of simplicity, the March move should be governed by the same rules as the Move order (outside of the special rule that prevents you from using this) but with simply double the move rate of the unit.
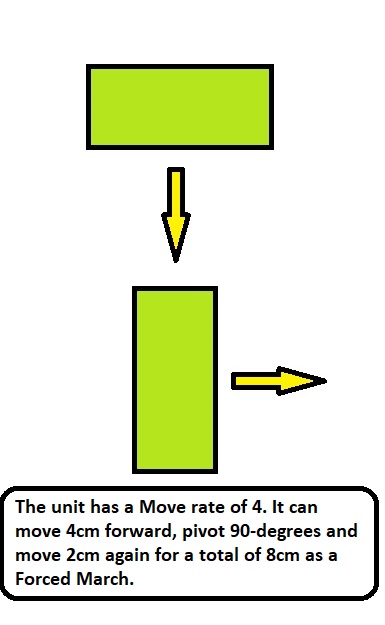
Any unit may Force March directly forward according to twice its move rate. The unit may pivot on the spot (around its center) at any point during its movement for up to 90 degrees but this costs half of its move rate, rounded up.
This will allow a unit with Move 4 to move 8cm directly forward, or move 4cm forward, perform a 90-degree pivot and move a further 2cm, or any other combinations that don’t exceed its maximum move rate.
This is it for this article and for general movement rules! Next in the series we will be visiting combat and how to get into said combat, namely Charging!
If you want to check out the other parts of these Rules series, go here: Terrain rules
Leave a Reply